Knee Pain Joint Gapping
Knee pain and stiffness plague nearly every grappler at some point. Whether from hours spent kneeling on mats, deep guard retention positions, or simply the cumulative stress of training, restricted knee mobility limits your performance and enjoyment of BJJ.

The good news? A simple joint gapping technique can provide immediate relief while setting the foundation for lasting improvement.
Why Knee Gapping Works
Your knee joint is surrounded by a capsule filled with synovial fluid—your body's natural lubricant. When this capsule becomes tight or restricted, several problems develop:
Limited range of motion (can't bend or straighten fully)
Poor fluid circulation (increased friction and inflammation)
Pain with movement (especially deep flexion)
Clicking or grinding sensations
Joint gapping creates distraction (space) between the bones of your knee. This mechanical separation:
Reduces compression on pain-sensitive structures
Mobilizes synovial fluid for better lubrication
Stretches the capsule to restore normal motion
Provides neurological feedback that reduces protective guarding
Research shows that just 2-5 minutes of gapping per side can instantly increase joint suppleness and reduce pain. But here's the critical part most people miss: gapping creates opportunity—loading makes it permanent.
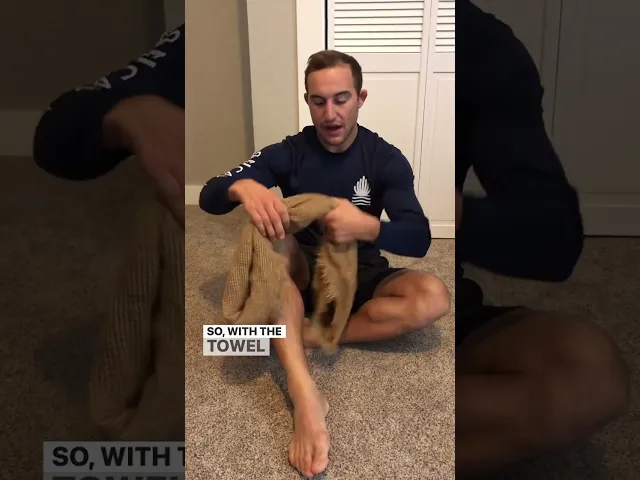
The Towel Roll Knee Gapping Technique
This is our go-to technique for knee flexion restrictions. It's simple, effective, and requires only a towel.
Equipment Needed:
One bath towel or hand towel
Your hands
Step-by-Step Instructions:
1. Setup:
Sit on a firm surface with legs extended
Roll your towel tightly into a 3-4 inch cylinder
Position the rolled towel in your knee crease (where thigh meets calf)
2. Create the gapping force:
Bend your knee to trap the towel
Grab your ankle with both hands
Pull your ankle toward your buttock while the towel creates a "wedge"
You're NOT just bending—you're pulling to create joint distraction
3. Hold and repeat:
Pull firmly for 6 seconds
You should feel a "hurts so good" deep pressure (3-4/10 intensity)
Pause for 2-3 seconds WITHOUT releasing the position
Repeat for 10 total reps, bending slightly deeper each time
Dosage:
Acute pain/stiffness: 2-3 times daily
Maintenance: Once daily
Pre-training: As part of warmup
Post-training: For recovery
What you should feel: Deep pressure throughout the knee during the pull. After 10 reps, your knee should feel lighter, less tight, and able to bend more easily.
Common mistakes:
Just bending without creating actual distraction (must pull your shin toward you)
Towel too thin (needs to be 3-4 inches thick)
Rushing through reps (sustain full 6 seconds)
Releasing position between reps (maintain depth to build progressive improvement)
The Critical Next Step: Load the New Range
Your knee feels better after gapping. Excellent. But here's where most people fail: they stop at symptom relief.
The key to lasting improvement is loading the joint in its new range immediately after gapping.
Why Loading Matters:
Without reinforcing the improved range through movement and load, your body simply reverts to its previous restricted state. The capsule tightens again, stiffness returns, and you're dependent on constant gapping for temporary relief.
What to Do Immediately After Gapping:
1. Bodyweight squats (10-15 reps)
Go as deep as your improved flexion allows
Move slowly and deliberately
Use the full range you just created
2. Step-ups (10-15 reps per leg)
12-18 inch box or bench
Lead with the leg you gapped
Emphasize control through full ROM
3. Bulgarian split squats (8-12 reps)
Rear foot elevated
Lower into deep lunge
Match the depth of your improved flexion
This loading sequence teaches your nervous system that the new range is safe and functional. Over 2-3 weeks of consistent gapping + loading, the improvements become permanent.
Our 3-Phase Treatment System
Knee gapping is Phase 1 (CONTROL) of our complete rehabilitation approach:
Phase 1: CONTROL (Weeks 1-3)
Gapping to restore range of motion
Pain reduction to 85-100%
Activity modification as needed
Soft tissue work for supporting structures
Phase 2: BUILD (Weeks 4-12)
Progressive strengthening
Movement pattern correction
Sport-specific training
Address root causes (hip restrictions, etc.)
Phase 3: MAINTAIN (Ongoing)
Minimal ongoing work
Self-management for minor flare-ups
Injury prevention strategies
Performance optimization
Most people stop after Phase 1 and wonder why symptoms return. We guide you through all three phases for lasting results.
When Gapping Isn't Enough
If you've performed this technique correctly 2-3 times daily for 2 weeks without improvement, several possibilities exist:
Your restriction may be more related to muscle tightness than capsular restriction
Structural damage may require different intervention
Inflammation needs to be addressed first
The stiffness stems from upstream issues (hip restrictions, ankle limitations)
Our I3 Model Assessment identifies whether your knee restriction comes from:
Incomplete mechanics (poor movement patterns)
Incident (specific injury event)
Injury (structural damage)
Understanding the root cause determines the most effective treatment strategy.
Contraindications
Do NOT perform knee gapping if you have:
Acute injury with significant swelling (first 48-72 hours)
Recent knee surgery (within 6 weeks)
Severe instability or frequent giving way
Sharp pain (8+/10) even at rest
Active infection or inflammatory arthritis flare
Stop immediately if you experience:
Sharp, shooting pain during the technique
Significant swelling within hours of performing
Increased instability
Pain that doesn't return to baseline within 30 minutes
When in doubt, schedule a free discovery call to determine if this technique is appropriate for your situation.
Conclusion
Knee joint gapping provides rapid relief for stiffness and restricted flexion. But remember: gapping creates opportunity, loading makes it permanent.
Follow this sequence for best results:
Gap your knee (towel technique, 10 reps)
Load the new range immediately (squats, step-ups, lunges)
Repeat 2-3 times daily during acute symptoms
Progress to once daily for maintenance
Address root causes to prevent recurrence
Stiff knees don't have to limit your training. With consistent application and proper progression, you can restore full mobility and train without restrictions.
Need more help? Download our free knee injury rehab guide or book a discovery call to create a personalized treatment plan.
Blog
Related Guides:

SI Joint Dysfunction & Spinal Stenosis in BJJ: Complete Guide (2025)
Oct 3, 2025
Knee Injuries

Lumbar Disc Herniation & Sciatica in BJJ: Complete Guide (2025)
Oct 3, 2025
Knee Injuries

BJJ Lower Back Pain: Strains, Sprains & Facet Syndrome Guide (2025)
Oct 3, 2025
Knee Injuries

BJJ Stingers, Burners & Facet Joint Syndrome
Oct 3, 2025
Knee Injuries


Results
Join 500+ Grapplers
Who Chose Expertise Over Generic Healthcare
90% of our patients avoid surgery
95% patient satisfaction rate
8-12 sessions average plan of care
Serving grapplers worldwide. Virtual sessions. Real results.
Ready to Train Without Pain?
Book your free call today. If your initial evaluation doesn't deliver value, you don't pay. That's our 100% satisfaction guarantee.

