5 Training Zones

Dalton Urrutia
•
October 1, 2025

5 Training Zones
Dalton Urrutia
•
October 1, 2025
5 Training Zones
Dalton Urrutia
•
October 1, 2025
Most BJJ athletes train at one intensity: hard. Every round is a battle. Every drill session turns into rolling. The result? You're always tired, never improving, and wondering why your cardio isn't getting better despite training 4-5 days per week.
The solution? Understanding and applying the 5 training zones to your conditioning work.
Elite endurance athletes have used heart rate zone training for decades. Now, more combat sport athletes are discovering how strategic training across different zones produces better results than just "going hard" all the time.
This guide explains the 5 training zones, what each develops, and how to apply them to BJJ-specific conditioning.
What Are Heart Rate Training Zones?
Heart rate training zones are specific heart rate ranges that correspond to different metabolic states in your body. Each zone creates distinct physiological adaptations.
Two key factors define each zone:
Fuel mixture used: The balance between fats and carbohydrates your body burns
Physiological adaptations: The specific traits your body develops when training in that zone
For example, Zone 2 training maximizes fat burning and mitochondrial development, while Zone 5 training improves maximum power output and VO2max.
Understanding Your Body's Fuel System
Your body has two primary fuel sources during exercise:
Fats:
Provides 9 calories per gram
Burns slowly (requires more oxygen)
Suitable for low-intensity, long-duration activity
Nearly unlimited storage (even lean athletes have thousands of calories stored as fat)
Carbohydrates:
Provides 4 calories per gram
Burns quickly (less oxygen required)
Suitable for high-intensity activity
Limited storage (~2000 calories as glycogen)
The intensity-fuel relationship:
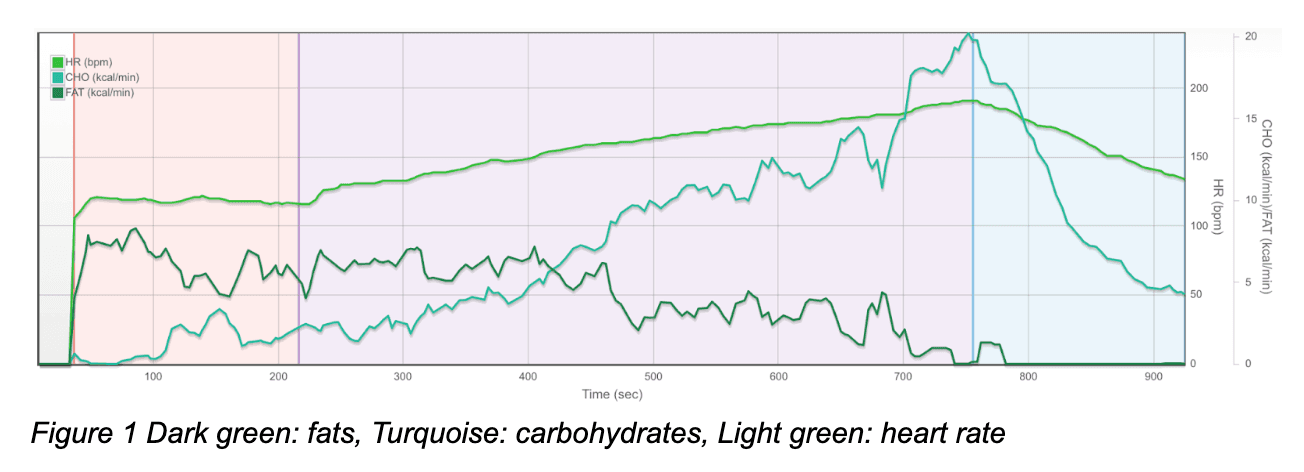
As exercise intensity increases, your body shifts from primarily fat-burning to primarily carbohydrate-burning. This shift happens progressively through the training zones.
Why this matters for BJJ:
A 5-minute hard round depletes glycogen rapidly. If you can't efficiently use fat as fuel during lower-intensity periods (between rounds, during positional work), you'll hit the wall faster. Training across all zones improves both fuel systems.
How Heart Rate Reflects Metabolic State
Measuring oxygen consumption and CO2 production requires expensive lab equipment (metabolic cart with mask). This isn't practical for daily training.
The solution: Heart rate serves as an accurate proxy for metabolic state.
How it works:
Lab testing establishes your personal correlation between heart rate and fuel usage
You get customized heart rate zones
You train using a heart rate monitor
Your zones guide training intensity
Important considerations:
Zones are personalized—your Zone 2 isn't the same as someone else's
Zones differ by activity (running zones ≠ cycling zones ≠ BJJ zones)
Zones change as you get fitter (retest every 8-12 weeks)
Generic formulas (220 - age) are inaccurate—use proper testing when possible
The 5 Training Zones Explained
Zone 1: Active Recovery
Heart rate: 50-60% of maximum
Perceived exertion: Very easy, can hold full conversation
Duration: 20-60 minutes
Fuel mix: 85% fat, 15% carbs
Purpose:
Warmup before training
Active recovery between hard sessions
Recovery from intense exercise while moving
Promotes blood flow without creating fatigue
BJJ applications:
Light technical drilling
Flow rolling
Movement-based warmup
Day after competition recovery
When to use:
Before every training session (5-10 min warmup)
Off-day recovery work
After very hard training sessions
Training example:
20-30 minute easy bike ride
Light jogging or walking
Gentle movement flow
Mistake to avoid: Going too hard on recovery days. Zone 1 should feel almost boring—that's the point.
Zone 2: Aerobic Base
Heart rate: 60-70% of maximum
Perceived exertion: Easy, can speak in full sentences with slight breathlessness
Duration: 30-90 minutes
Fuel mix: 70% fat, 30% carbs
Purpose:
Develops mitochondrial density (cellular energy factories)
Improves fat-burning efficiency
Builds aerobic base for recovery between hard efforts
Most important zone for long-term conditioning development
Physiological adaptations:
Increased mitochondrial density
Improved fat oxidation capacity
Enhanced recovery ability
Better clearance of metabolic waste products
BJJ applications:
Long-duration positional work
Extended technical drilling sessions
Base conditioning for competition camps
Improves recovery between rounds
When to use:
1-2 dedicated Zone 2 sessions weekly
45-90 minutes per session
Most important for competition preparation
Training examples:
60-minute steady-state run or bike
45-minute rowing at conversational pace
Long swimming session
Extended flow rolling (if you can maintain zone)
Why it matters for BJJ:
Most BJJ training lives in Zone 3-4. Without adequate Zone 2 work, you lack the aerobic base to recover between hard efforts. This is why you "hit the wall" 3-4 rounds into sparring.
The most undertrained zone in BJJ athletes.
Zone 3: Tempo
Heart rate: 70-80% of maximum
Perceived exertion: Moderate, can speak in short sentences, breathing noticeable
Duration: 20-60 minutes
Fuel mix: 50% fat, 50% carbs
Purpose:
Strengthens cardiovascular system
Develops pulmonary (lung) capacity
Sustainable "push pace"
Bridges aerobic and anaerobic systems
BJJ applications:
Moderate-intensity drilling
Technical sparring
Competition pace positional rounds
Most live training naturally falls here
When to use:
Naturally occurs during most BJJ training
Don't need dedicated sessions—you're already here
Can be used for longer endurance work
Training examples:
Tempo runs (20-40 minutes at steady moderate pace)
Continuous drilling with brief rests
Light sparring rounds back-to-back
The problem:
Most BJJ athletes live in Zone 3. They go too hard for effective Zone 2 work, but not hard enough to develop Zone 4-5 capacities. This "middle zone" training provides moderate benefits but prevents optimization.
Solution: Dedicate some training to Zone 2 (easier) and some to Zone 4-5 (harder). Don't always train in Zone 3.
Zone 4: Threshold
Heart rate: 80-90% of maximum
Perceived exertion: Hard, can speak only 1-2 words at a time, heavy breathing
Duration: 8-30 minutes total (typically intervals)
Fuel mix: 30% fat, 70% carbs
Purpose:
Improves lactate threshold (ability to sustain high intensity)
Enhances lactate shuttling (using lactate as fuel)
Develops VO2max
Increases sustainable power output
Physiological adaptations:
Improved lactate clearance
Greater tolerance to metabolic stress
Increased anaerobic capacity
Better ability to maintain high pace
BJJ applications:
Hard sparring rounds
Competition-intensity training
Specific interval conditioning
The intensity of most competitive matches
When to use:
1-2 dedicated interval sessions weekly
During hard sparring sessions
Competition simulation training
Training examples:
Interval protocol:
4-6 rounds x 4 minutes @ Zone 4 intensity
2-3 minutes rest between rounds
Mimics competition structure
BJJ-specific:
Hard rounds with brief rests
Shark tanks
Competition simulation
Why it matters for BJJ:
Matches are typically fought at Zone 4 intensity. Your ability to sustain this intensity and recover between exchanges determines performance.
Zone 5: Maximum Effort
Heart rate: 90-100% of maximum
Perceived exertion: Maximum, cannot speak, gasping
Duration: 30 seconds to 2 minutes
Fuel mix: 10% fat, 90% carbs (pure glycolytic)
Purpose:
Develops maximum power output
Improves peak VO2max
Builds explosive capacity
Enhances anaerobic power
Physiological adaptations:
Increased maximum power
Improved neuromuscular efficiency
Greater tolerance to extreme fatigue
Enhanced recovery from maximal efforts
BJJ applications:
Explosive scrambles
Intense guard passing sequences
Fight-ending submission attempts
Emergency escape situations
When to use:
Sparingly—high neural demand
1 session per week maximum
Short intervals with full recovery
Training examples:
Sprint intervals:
6-10 rounds x 30-90 seconds maximum effort
3-5 minutes full recovery between rounds
Examples: hill sprints, assault bike sprints, battle ropes
BJJ-specific:
30-second maximum intensity positional sparring
Full recovery (4-5 minutes) between rounds
Focus on explosive movements
Warning:
Zone 5 is extremely taxing on the nervous system. More isn't better—quality over quantity. Overusing Zone 5 leads to burnout, overtraining, and increased injury risk.
How to Determine Your Personal Zones
Method 1: Lab Testing (Most Accurate)
Metabolic testing:
VO2max test with metabolic cart
Measures actual oxygen consumption and CO2 production
Provides personalized zones based on your physiology
Cost: $150-300
Retest every 8-12 weeks as fitness improves
Lactate threshold testing:
Blood lactate measured at increasing intensities
Identifies exact threshold points
Highly accurate zones
Cost: $100-200
Method 2: Field Testing (Good Accuracy)
30-minute time trial:
Warmup 10-15 minutes
Perform 30-minute maximum sustained effort (run, bike, row)
Your average heart rate = approximately your Zone 4 threshold
Calculate other zones from this baseline
Estimated zones:
Zone 1: 50-60% of time trial HR
Zone 2: 60-70% of time trial HR
Zone 3: 70-80% of time trial HR
Zone 4: 80-90% of time trial HR (time trial average)
Zone 5: 90-100% of time trial HR
Method 3: Formula (Least Accurate, Better Than Nothing)
If you have zero data:
Estimate max HR: 220 - age = maximum heart rate
Calculate zones as percentages (listed in each zone above)
Example: 30-year-old athlete
Estimated max HR: 220 - 30 = 190 bpm
Zone 1: 95-114 bpm (50-60%)
Zone 2: 114-133 bpm (60-70%)
Zone 3: 133-152 bpm (70-80%)
Zone 4: 152-171 bpm (80-90%)
Zone 5: 171-190 bpm (90-100%)
Problem: This method can be off by 10-20 beats per minute. Use only if testing isn't available.
Training Zone Distribution for BJJ Athletes
Weekly training structure:
Option 1: 4-5 BJJ sessions + 2-3 conditioning sessions
2-3x Zone 2 (aerobic base): 45-90 min each
1x Zone 4 (threshold intervals): 20-30 min
1x Zone 5 (max effort): 15-20 min
Zone 1 (recovery): As needed between hard sessions
Zone 3 (tempo): Naturally occurs during BJJ training
Option 2: BJJ-focused (limited conditioning time)
1x Zone 2: 60-90 min (critical—don't skip)
1x Zone 4: 20-30 min
Zone 5: Integrated into hard sparring
Zone 1: Warmup before BJJ
Competition preparation:
Shift distribution based on phase:
Base phase (12+ weeks out):
Emphasize Zone 2 (60-70% of conditioning)
Build aerobic foundation
Build phase (6-12 weeks out):
Balance Zone 2 and Zone 4 (40% / 40%)
Develop lactate threshold
Peak phase (1-6 weeks out):
Emphasize Zone 4-5 (60% high intensity)
Competition-specific conditioning
Maintain some Zone 2 for recovery
Common Mistakes
Mistake #1: Always training in Zone 3 Most BJJ training naturally sits in Zone 3. This provides moderate benefits but prevents optimal development. Go easier (Zone 2) or harder (Zone 4-5), but don't always sit in the middle.
Mistake #2: Never training Zone 2 "Easy" training feels like a waste. But Zone 2 builds the aerobic base that powers recovery between hard efforts. Skip it, and you'll always hit the wall.
Mistake #3: Too much Zone 5 Maximum efforts are taxing. More Zone 5 doesn't equal better conditioning—it equals overtraining, poor recovery, and increased injury risk.
Mistake #4: Ignoring personalization Using generic formulas or someone else's zones provides mediocre results. Get tested or use field testing for accurate zones.
Mistake #5: Not tracking Training by "feel" leads to inconsistent intensities. Use a heart rate monitor to stay in intended zones.
Tools and Equipment
Heart rate monitors:
Chest strap: Most accurate (Polar H10, Garmin HRM-Pro)
Wrist-based: Convenient but less accurate (Apple Watch, Garmin watches)
Budget option: Chest strap + phone app (~$50-80)
Apps for tracking:
Free: Strava, Polar Beat
Paid: TrainingPeaks, Polar Flow
For BJJ-specific tracking:
Chest strap works under gi
Use grappling-specific apps that account for BJJ intensity patterns
Conclusion
Training zones provide structure to conditioning work. Instead of always training hard, you strategically develop different energy systems across the 5 zones.
Key takeaways:
Zone 2 is most important for BJJ athletes (and most neglected)
Don't always train in Zone 3 (tempo)—go easier or harder
Zone 4 mimics match intensity—develop lactate threshold
Zone 5 sparingly—high neural demand
Get tested for personalized zones when possible
Track with HR monitor for consistency
Most BJJ athletes improve dramatically by adding just one 60-90 minute Zone 2 session weekly. Start there.
Most BJJ athletes train at one intensity: hard. Every round is a battle. Every drill session turns into rolling. The result? You're always tired, never improving, and wondering why your cardio isn't getting better despite training 4-5 days per week.
The solution? Understanding and applying the 5 training zones to your conditioning work.
Elite endurance athletes have used heart rate zone training for decades. Now, more combat sport athletes are discovering how strategic training across different zones produces better results than just "going hard" all the time.
This guide explains the 5 training zones, what each develops, and how to apply them to BJJ-specific conditioning.
What Are Heart Rate Training Zones?
Heart rate training zones are specific heart rate ranges that correspond to different metabolic states in your body. Each zone creates distinct physiological adaptations.
Two key factors define each zone:
Fuel mixture used: The balance between fats and carbohydrates your body burns
Physiological adaptations: The specific traits your body develops when training in that zone
For example, Zone 2 training maximizes fat burning and mitochondrial development, while Zone 5 training improves maximum power output and VO2max.
Understanding Your Body's Fuel System
Your body has two primary fuel sources during exercise:
Fats:
Provides 9 calories per gram
Burns slowly (requires more oxygen)
Suitable for low-intensity, long-duration activity
Nearly unlimited storage (even lean athletes have thousands of calories stored as fat)
Carbohydrates:
Provides 4 calories per gram
Burns quickly (less oxygen required)
Suitable for high-intensity activity
Limited storage (~2000 calories as glycogen)
The intensity-fuel relationship:
As exercise intensity increases, your body shifts from primarily fat-burning to primarily carbohydrate-burning. This shift happens progressively through the training zones.
Why this matters for BJJ:
A 5-minute hard round depletes glycogen rapidly. If you can't efficiently use fat as fuel during lower-intensity periods (between rounds, during positional work), you'll hit the wall faster. Training across all zones improves both fuel systems.
How Heart Rate Reflects Metabolic State
Measuring oxygen consumption and CO2 production requires expensive lab equipment (metabolic cart with mask). This isn't practical for daily training.
The solution: Heart rate serves as an accurate proxy for metabolic state.
How it works:
Lab testing establishes your personal correlation between heart rate and fuel usage
You get customized heart rate zones
You train using a heart rate monitor
Your zones guide training intensity
Important considerations:
Zones are personalized—your Zone 2 isn't the same as someone else's
Zones differ by activity (running zones ≠ cycling zones ≠ BJJ zones)
Zones change as you get fitter (retest every 8-12 weeks)
Generic formulas (220 - age) are inaccurate—use proper testing when possible
The 5 Training Zones Explained
Zone 1: Active Recovery
Heart rate: 50-60% of maximum
Perceived exertion: Very easy, can hold full conversation
Duration: 20-60 minutes
Fuel mix: 85% fat, 15% carbs
Purpose:
Warmup before training
Active recovery between hard sessions
Recovery from intense exercise while moving
Promotes blood flow without creating fatigue
BJJ applications:
Light technical drilling
Flow rolling
Movement-based warmup
Day after competition recovery
When to use:
Before every training session (5-10 min warmup)
Off-day recovery work
After very hard training sessions
Training example:
20-30 minute easy bike ride
Light jogging or walking
Gentle movement flow
Mistake to avoid: Going too hard on recovery days. Zone 1 should feel almost boring—that's the point.
Zone 2: Aerobic Base
Heart rate: 60-70% of maximum
Perceived exertion: Easy, can speak in full sentences with slight breathlessness
Duration: 30-90 minutes
Fuel mix: 70% fat, 30% carbs
Purpose:
Develops mitochondrial density (cellular energy factories)
Improves fat-burning efficiency
Builds aerobic base for recovery between hard efforts
Most important zone for long-term conditioning development
Physiological adaptations:
Increased mitochondrial density
Improved fat oxidation capacity
Enhanced recovery ability
Better clearance of metabolic waste products
BJJ applications:
Long-duration positional work
Extended technical drilling sessions
Base conditioning for competition camps
Improves recovery between rounds
When to use:
1-2 dedicated Zone 2 sessions weekly
45-90 minutes per session
Most important for competition preparation
Training examples:
60-minute steady-state run or bike
45-minute rowing at conversational pace
Long swimming session
Extended flow rolling (if you can maintain zone)
Why it matters for BJJ:
Most BJJ training lives in Zone 3-4. Without adequate Zone 2 work, you lack the aerobic base to recover between hard efforts. This is why you "hit the wall" 3-4 rounds into sparring.
The most undertrained zone in BJJ athletes.
Zone 3: Tempo
Heart rate: 70-80% of maximum
Perceived exertion: Moderate, can speak in short sentences, breathing noticeable
Duration: 20-60 minutes
Fuel mix: 50% fat, 50% carbs
Purpose:
Strengthens cardiovascular system
Develops pulmonary (lung) capacity
Sustainable "push pace"
Bridges aerobic and anaerobic systems
BJJ applications:
Moderate-intensity drilling
Technical sparring
Competition pace positional rounds
Most live training naturally falls here
When to use:
Naturally occurs during most BJJ training
Don't need dedicated sessions—you're already here
Can be used for longer endurance work
Training examples:
Tempo runs (20-40 minutes at steady moderate pace)
Continuous drilling with brief rests
Light sparring rounds back-to-back
The problem:
Most BJJ athletes live in Zone 3. They go too hard for effective Zone 2 work, but not hard enough to develop Zone 4-5 capacities. This "middle zone" training provides moderate benefits but prevents optimization.
Solution: Dedicate some training to Zone 2 (easier) and some to Zone 4-5 (harder). Don't always train in Zone 3.
Zone 4: Threshold
Heart rate: 80-90% of maximum
Perceived exertion: Hard, can speak only 1-2 words at a time, heavy breathing
Duration: 8-30 minutes total (typically intervals)
Fuel mix: 30% fat, 70% carbs
Purpose:
Improves lactate threshold (ability to sustain high intensity)
Enhances lactate shuttling (using lactate as fuel)
Develops VO2max
Increases sustainable power output
Physiological adaptations:
Improved lactate clearance
Greater tolerance to metabolic stress
Increased anaerobic capacity
Better ability to maintain high pace
BJJ applications:
Hard sparring rounds
Competition-intensity training
Specific interval conditioning
The intensity of most competitive matches
When to use:
1-2 dedicated interval sessions weekly
During hard sparring sessions
Competition simulation training
Training examples:
Interval protocol:
4-6 rounds x 4 minutes @ Zone 4 intensity
2-3 minutes rest between rounds
Mimics competition structure
BJJ-specific:
Hard rounds with brief rests
Shark tanks
Competition simulation
Why it matters for BJJ:
Matches are typically fought at Zone 4 intensity. Your ability to sustain this intensity and recover between exchanges determines performance.
Zone 5: Maximum Effort
Heart rate: 90-100% of maximum
Perceived exertion: Maximum, cannot speak, gasping
Duration: 30 seconds to 2 minutes
Fuel mix: 10% fat, 90% carbs (pure glycolytic)
Purpose:
Develops maximum power output
Improves peak VO2max
Builds explosive capacity
Enhances anaerobic power
Physiological adaptations:
Increased maximum power
Improved neuromuscular efficiency
Greater tolerance to extreme fatigue
Enhanced recovery from maximal efforts
BJJ applications:
Explosive scrambles
Intense guard passing sequences
Fight-ending submission attempts
Emergency escape situations
When to use:
Sparingly—high neural demand
1 session per week maximum
Short intervals with full recovery
Training examples:
Sprint intervals:
6-10 rounds x 30-90 seconds maximum effort
3-5 minutes full recovery between rounds
Examples: hill sprints, assault bike sprints, battle ropes
BJJ-specific:
30-second maximum intensity positional sparring
Full recovery (4-5 minutes) between rounds
Focus on explosive movements
Warning:
Zone 5 is extremely taxing on the nervous system. More isn't better—quality over quantity. Overusing Zone 5 leads to burnout, overtraining, and increased injury risk.
How to Determine Your Personal Zones
Method 1: Lab Testing (Most Accurate)
Metabolic testing:
VO2max test with metabolic cart
Measures actual oxygen consumption and CO2 production
Provides personalized zones based on your physiology
Cost: $150-300
Retest every 8-12 weeks as fitness improves
Lactate threshold testing:
Blood lactate measured at increasing intensities
Identifies exact threshold points
Highly accurate zones
Cost: $100-200
Method 2: Field Testing (Good Accuracy)
30-minute time trial:
Warmup 10-15 minutes
Perform 30-minute maximum sustained effort (run, bike, row)
Your average heart rate = approximately your Zone 4 threshold
Calculate other zones from this baseline
Estimated zones:
Zone 1: 50-60% of time trial HR
Zone 2: 60-70% of time trial HR
Zone 3: 70-80% of time trial HR
Zone 4: 80-90% of time trial HR (time trial average)
Zone 5: 90-100% of time trial HR
Method 3: Formula (Least Accurate, Better Than Nothing)
If you have zero data:
Estimate max HR: 220 - age = maximum heart rate
Calculate zones as percentages (listed in each zone above)
Example: 30-year-old athlete
Estimated max HR: 220 - 30 = 190 bpm
Zone 1: 95-114 bpm (50-60%)
Zone 2: 114-133 bpm (60-70%)
Zone 3: 133-152 bpm (70-80%)
Zone 4: 152-171 bpm (80-90%)
Zone 5: 171-190 bpm (90-100%)
Problem: This method can be off by 10-20 beats per minute. Use only if testing isn't available.
Training Zone Distribution for BJJ Athletes
Weekly training structure:
Option 1: 4-5 BJJ sessions + 2-3 conditioning sessions
2-3x Zone 2 (aerobic base): 45-90 min each
1x Zone 4 (threshold intervals): 20-30 min
1x Zone 5 (max effort): 15-20 min
Zone 1 (recovery): As needed between hard sessions
Zone 3 (tempo): Naturally occurs during BJJ training
Option 2: BJJ-focused (limited conditioning time)
1x Zone 2: 60-90 min (critical—don't skip)
1x Zone 4: 20-30 min
Zone 5: Integrated into hard sparring
Zone 1: Warmup before BJJ
Competition preparation:
Shift distribution based on phase:
Base phase (12+ weeks out):
Emphasize Zone 2 (60-70% of conditioning)
Build aerobic foundation
Build phase (6-12 weeks out):
Balance Zone 2 and Zone 4 (40% / 40%)
Develop lactate threshold
Peak phase (1-6 weeks out):
Emphasize Zone 4-5 (60% high intensity)
Competition-specific conditioning
Maintain some Zone 2 for recovery
Common Mistakes
Mistake #1: Always training in Zone 3 Most BJJ training naturally sits in Zone 3. This provides moderate benefits but prevents optimal development. Go easier (Zone 2) or harder (Zone 4-5), but don't always sit in the middle.
Mistake #2: Never training Zone 2 "Easy" training feels like a waste. But Zone 2 builds the aerobic base that powers recovery between hard efforts. Skip it, and you'll always hit the wall.
Mistake #3: Too much Zone 5 Maximum efforts are taxing. More Zone 5 doesn't equal better conditioning—it equals overtraining, poor recovery, and increased injury risk.
Mistake #4: Ignoring personalization Using generic formulas or someone else's zones provides mediocre results. Get tested or use field testing for accurate zones.
Mistake #5: Not tracking Training by "feel" leads to inconsistent intensities. Use a heart rate monitor to stay in intended zones.
Tools and Equipment
Heart rate monitors:
Chest strap: Most accurate (Polar H10, Garmin HRM-Pro)
Wrist-based: Convenient but less accurate (Apple Watch, Garmin watches)
Budget option: Chest strap + phone app (~$50-80)
Apps for tracking:
Free: Strava, Polar Beat
Paid: TrainingPeaks, Polar Flow
For BJJ-specific tracking:
Chest strap works under gi
Use grappling-specific apps that account for BJJ intensity patterns
Conclusion
Training zones provide structure to conditioning work. Instead of always training hard, you strategically develop different energy systems across the 5 zones.
Key takeaways:
Zone 2 is most important for BJJ athletes (and most neglected)
Don't always train in Zone 3 (tempo)—go easier or harder
Zone 4 mimics match intensity—develop lactate threshold
Zone 5 sparingly—high neural demand
Get tested for personalized zones when possible
Track with HR monitor for consistency
Most BJJ athletes improve dramatically by adding just one 60-90 minute Zone 2 session weekly. Start there.

